Thursday, May 7, 2015

How to Configure SharePoint Search Center with result types through Powershell script

When we think of deployment scenarios onto multiple servers, we always try to find better way of doing the deployment, especially if there are lots of configuration changes to be done in the environments. Power shell scripts are smarter ways to get the Job done with minimal manual intervention. The power shell script helps to deploy result types for Search Center Configuration.

The Configuration XML file looks something like this ConfigureSearchCenter.xml which can be highly configured to meet requirement for deployment by providing values of simple parameters -


<?xml version="1.0" encoding="utf-8"?>
<Configuration>
<SearchCenterUrl>http://SearchCenterUrl</SearchCenterUrl>
<SearchServiceApplication>Search Service Application</SearchServiceApplication>
<ResultTypes>
  <resulttype filteron="ContentSource" filteroperator="IsEqual" filtervalue="FilterContent" itemtemplate="Custom_Default.js" itemtemplatepath="Search" name="Custom Result Type"></resulttype>
</ResultTypes>
</Configuration>


Powershell script for configuring search center through result type -

Add-PSSnapin Microsoft.SharePoint.PowerShell -ErrorAction SilentlyContinue

Write-Host "Configure Search Center begins...."

$testResultTypeName = "Custom Result Type"

$rootScriptPath = Split-Path -parent $MyInvocation.MyCommand.Definition

[xml]$config = Get-Content ($rootScriptPath + "\ConfigureSearchCenter.xml")
$searchCenterUrl = $config.Configuration.SearchCenterUrl
$resultTypeNodes = $config.SelectNodes("//ResultTypes/ResultType")

try {
$sspApp = Get-SPEnterpriseSearchServiceApplication -Identity $config.Configuration.SearchServiceApplication
$web = Get-SPWeb $searchCenterUrl
$searchObjectOwner = Get-SPEnterpriseSearchOwner -Level SPWeb -SPWeb $web

if ($sspApp -ne $null -and $web -ne $null -and $searchObjectOwner -ne $null) {
foreach($resultTypeNode in $resultTypeNodes) {
#check to make sure it doesn't already exist
$resultItemType = Get-SPEnterpriseSearchResultItemType -Owner $searchObjectOwner -SearchApplication $sspApp | Where Name -EQ $resultTypeNodes.Name

#Remove the Result Type if it exists
if ($resultItemType -ne $null) {
Write-Host -ForegroundColor Yellow -BackgroundColor Black "Result Item Type " $resultTypeNode.Name " exists, removing it...."
Remove-SPEnterpriseSearchResultItemType -Owner $searchObjectOwner -SearchApplication $sspApp -Identity $resultItemType -Confirm:$false
}

$rule = Get-SPEnterpriseSearchPropertyRule -PropertyName $resultTypeNode.FilterOn -Operator $resultTypeNode.FilterOperator
$rule.AddValue($resultTypeNode.FilterValue)
$ruleCollection = Get-SPEnterpriseSearchPropertyRuleCollection
$ruleCollection.Add($rule)
$url = "~sitecollection/_catalogs/masterpage/Display Templates/" + $resultTypeNode.ItemTemplatePath + "/" + $resultTypeNode.ItemTemplate
$item = New-SPEnterpriseSearchResultItemType -Owner $searchObjectOwner -SearchApplication $sspApp -Name $resultTypeNode.Name -Rules $ruleCollection -RulePriority 1 -DisplayTemplateUrl $url -OptimizeForFrequentUse $true

Write-Host $resultTypeNode.Name " Result Type added"
}

$web.Close()
$web.Dispose()
} else {
Write-Host -ForegroundColor Red "Unable to retrieve pre-requisite objects to configure Search Center (Search Service App, SPWeb, or Search Owner)"
}
}
catch {
Write-Host -ForegroundColor Red "An error occurred configuring Search Center: " $_.Exception
return $_.Exception
}

This will make lot of ease while deploying your search center configuration scripts on other servers.

Friday, March 20, 2015

How to Deploy artifacts in SharePoint library through power-shell scripts

There could be sometime need to deploy your artifacts onto the SharePoint document library through power shell scripts in case of deployment onto different servers. Power shell scripts provide better maintenance of deployment mechanism.

In this post we will talk about the deployment of files onto Site Assets library using power shell script. Here we are going to take all the documents present within the folder Site Assests which has been given in the LocalPath attribute of the configuration XML.

Here we have made the deployment configurable through the artifact.xml. Essentially all the folders which needs to be deployed on to document library on the sharePoint site can be used in the xml file.
Hence the root level of the XML is Configuration and it takes an element for SiteUrl.

SiteUrl - The url for the SharePoint site to which the deployment needs to be done.
Library :
Name - The document library name onto which the documents needs to be doployed.
IsSiteAsset - If the document needs to be deployed onto SiteAssets library or not.
LocalPath - The folder structure from which all the files will be taken.
URL - The URL of the document library.

The Artifacts xml will look something like below -

<?xml version="1.0" encoding="utf-8"?>
<Configuration>
<FileDeployment>Files to be uploaded onto Site</FileDeployment>
<SiteUrl>http://siteurl/</SiteUrl>
<Libraries>
  <Library Name="SiteAssets" IsSiteAsset="true" LocalPath="Site Assets" URL="SiteAssets"/>
</Libraries>
</Configuration>


The corresponding Powershell script which will perform the deployment is given below -


Add-PSSnapin Microsoft.SharePoint.PowerShell -ErrorAction SilentlyContinue
$rootScriptPath = Split-Path -parent $MyInvocation.MyCommand.Definition

[xml]$configXML = Get-Content ($rootScriptPath + "\ArtifactDeploy.xml")

#Site Collection where you want to upload files
$siteUrl = $configXML.Configuration.SiteUrl

try {

[system.reflection.assembly]::LoadWithPartialName("Microsoft.Sharepoint")
$web = Get-SPWeb $siteUrl
 
$FilesLocation = $configXML.SelectNodes("//Libraries/Library")

foreach($location in $FilesLocation) {

$files = ([System.IO.DirectoryInfo] (Get-Item ($rootScriptPath + "/" +$location.LocalPath))).GetFiles()

foreach($file in $files){
#Open file
$stream = $file.OpenRead()
#Add file
if($location.IsSiteAsset -eq "true"){
$Assetlist = $web.Lists[$location.URL]
if($Assetlist -ne $null){
$fileCollection = $Assetlist.RootFolder.Files
if($fileCollection -ne $null){
$uploaded = $fileCollection.Add($file.Name, $stream, $TRUE)
}
}
else{
Write-Host -ForegroundColor "Site Assets library specified at " $web.Url "/" $location.URL " doesn't exist."
break
}
}
else {
$folder = $web.GetFolder($location.URL);
$uploaded = $folder.Files.Add($folder.Url + "/" + $file.Name, $stream, $true)
}

#Close file stream
   $stream.Close();

if($uploaded -ne $null)
{
"Uploaded " + $file.Name

Write-Host $file have been uploaded to $location.Name
}
}
}

Hope this helps and enjoy doing your deployment.

Tuesday, March 17, 2015

How to connect to TFS to get build information onto SharePoint

All the TFS assemblies are available at the below location from where it can be added on the VS project -
c:\ Program Files (x86)\ Microsoft Visual Studio 12.0\ Common7\ IDE\ ReferenceAssemblies\ v2.0\

The code to connect to TFS looks like below -


using System;

using System.Collections.Generic;
using System.ComponentModel;
using System.Data;
using System.Drawing;
using System.Linq;
using System.Text;
using System.Threading.Tasks;
using System.Windows.Forms;
using Microsoft.TeamFoundation.Client;
using Microsoft.TeamFoundation.Build.Client;
using Microsoft.TeamFoundation.VersionControl.Client;

namespace TFSClientObjectModel

{
    public partial class Form1 : Form
    {
        public Form1()
        {
            InitializeComponent();
        }

        private void btnConnect_Click(object sender, EventArgs e)

        {

            string TfsUrl = "https://tfsurl";

            var server = TfsTeamProjectCollectionFactory.GetTeamProjectCollection(new Uri(TfsUrl));
            server.EnsureAuthenticated();

            var vcs = server.GetService();

            var teamProjects = vcs.GetAllTeamProjects(true);

            var buildServer = server.GetService();


            foreach (TeamProject proj in teamProjects)

            {
                var defs = buildServer.QueryBuildDefinitions(proj.Name);

                foreach (IBuildDefinition def in defs)

                {
                    if (!def.Name.Contains("Matched Name"))
                    {
                        continue;
                    }
                    this.lstMain.Items.Add(def.Name);

                    IBuildDetailSpec spec = buildServer.CreateBuildDetailSpec(proj.Name, def.Name);

                    // Set InformationTypes to null, otherwise query performance takes 10 min vs. a few seconds
                    spec.InformationTypes = null;
                    spec.MaxBuildsPerDefinition = 1;
                    spec.QueryOrder = BuildQueryOrder.FinishTimeDescending;

                    var builds = buildServer.QueryBuilds(spec);


                    if (builds.Builds.Length > 0)

                    {
                        var buildDetail = builds.Builds[0];

                        this.lstBuilds.Items.Add(string.Format("{0} - {1} - {2} - {3}", def.Name, buildDetail.Status.ToString(), buildDetail.FinishTime, buildDetail.LabelName));

                    }
                }
            }
        }
    }

}

This provides the basic information about the build details. Similarly we can get more information about version and other properties also.

Tuesday, March 10, 2015

How to replace status text with an image in the SharePoint listitem

If you have limited developer access to a SharePoint Team Site or no access to SharePoint Designer, this client-side workaround allows you to replace a set of standard text values with images in a list view. As an example, this script is useful for adding graphical representation of status indicators in a simple status dashboard.


Let’s assume we have a list named Environment with a column named Status which is lookup from another list on your site. The Status column can contain the following text values:
  • Active
  • InProgress
  • Complete
  • Cancelled
  • Scheduled
We have also uploaded a set of four corresponding images named green.png, yellow.png, red.png, amber.png and blue.png to an image library / site assets in the Team Site. When the list view is displayed for Environment, the text values for status column should be replaced with following corresponding images.
  • Active – green.png
  • Cancelled – yellow.png
  • Complete – red.png
  • InProgress – blue.png
  • Scheduled - amber.png
Add a Content Editor Web Part to the page containing list’s standard view and include the following script in the source. Once the page is loaded, the values displayed in the Status column are replaced with the appropriate image.
You can get the Jquery script from the following site - http://code.jquery.com/jquery-latest.min.js and store it in the site assets library of the Team site. 
You can place the below code in another Script.js file and store it in the site assets. 

Copy the path of the file in clipboard which looks something like this - http://<server-name>/sites/Support/SiteAssets/Script.js
Once the Script.js file has been created, you need to add content editor webpart on the list view webpart page. Edit the webpart and on the Toolpane properties in the Content Link, provide the url of the site assets where the file has been stored. Click on Apply and hit OK.

You will be able to see the change from text to image.

Note: As a warning, if the list view displays a large amount of data, then this script may cause a noticeable delay as it cycles through the HTML to perform the search and replace.

Tuesday, March 3, 2015

Summary and Detail Dashboards using the SharePoint OOTB webparts

In this post we will talk about creating a dashboard to display summary dashboard and on click of the item it displays the details dashboard in another page. We will achieve this by using the Out of the box (OOTB) web parts with no code.


  • Here we will create a Environment List which holds all the columns to be displayed in either summary dashboard or detailed dashboard. This will make loading of data into the list easier. 


  • Then we can create couple of views to display the data. We can create first view for Summary Dashboard to allow only few items to be displayed including the Title link. 


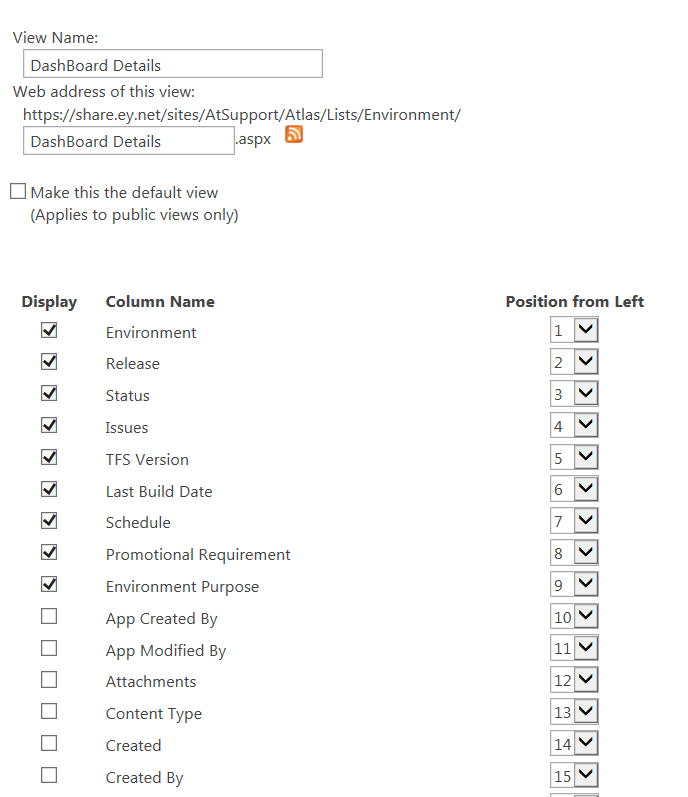
  • We can create a detailed view to hold all the columns values which are necessary to be shown.


  •  Create a Page for the Summary dashboard.
  • Add a List View webpart on the page.
  • Change the view of the webpart to Summary dashboard View.
  • Change the toolbar type to No Toolbar.
  • On click of the Title link it will redirect to displayform.aspx page.
  • In the Displayform.aspx page, edit the page and minimize the existing display webpart.
  • Add a List view webpart on the Dsiplay page.
  • Add a Query String (URL) Filter webpart on the display page.
  • Go to the webpart settings of the List View webpart, select the Details View to show all the columns being selected in this view. 
  • Change the toolbar type to No Toolbar.
  • Edit the Query String filter webpart and in the Query String Parameter name, provide the value "ID".
  • In the advanced filter options, select Send all values.
  • Use the Connections to send data from the Query String webpart and Get filter values from the List View webpart.
This makes the dashboard to work seamlessly without need of any codes. Enjoy...!!!